Tuesday, July 25, 2006

Pinhole Photography


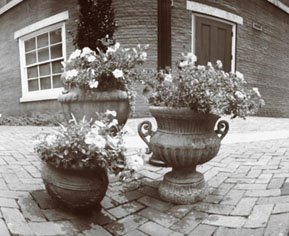
These images were created using a pinhole camera. I walked around Portsmouth for three days to get these. I used a gallon paint can that I purchased at a hardware store. I used a #9 embroidery needle to make the hole in a strip I cut out of a soda can. I used regular Photographic paper for the negative. At first I tried to calculate the exposure using a light meter and a fancy formula... that was a bust. You just have to go by general times and watch where the sun is constantly and adjust for it. After scanning in the image, I flipped it in photoshop, cleaned them up and printed them out as duotones onto Arches 140lb hot press watercolor paper. I think the most successful image was one of the first ones I took, the angel against the flat brick wall. She's in a planter and has a little bunny rabbit by her side.. very cute. I like the way the wide angle view of the pinhole makes the brick wall look like it's receding into the background. The sun glare on the left side was a happy accident too.

Tuesday, July 18, 2006


This project used very fine grained film (Maco TP ISO-64) and I underexposed the negatives by shooting it at ISO 200. I then processed it with Dektol developer at 68 degrees for 3 min. The pictures it produced were very high contrast with nice rich blacks and interesting highlights. It was a challenge to get good photos, I think I got a couple. The prints I made were all full frame. I think the natural border it gives complements the style nicely. Overall I'm pleased with the process. :-)

Thursday, July 06, 2006


Today is our due date for Cyanotypes! The color is Prussian Blue, very dark and rich in tones. The chemistry is mixed by hand and coated on paper using brushes or glass rods. The paper is dried then exposed with a negative. We printed our own negatives off the ink jet printer onto transparencies. The exposure was done outside in the sunlight. So depending on how sunny it was or how many clouds there were the times changed. I didn't even try to time them, I just went by what color it changed into. I had a few that turned out OK. Here are my favorites... For the Photogram I used a negative of seagull in a sunlit sky and placed feathers on top to make it look like they were falling out of the sky. The Rooftop image I handcolored with watercolor paint. Both photos were originally taken on Alcatraz Island in San Francisco. The two unmanipulated prints were taken in Las Vegas outside the Venician Hotel.

Tuesday, June 27, 2006

Polaroid Emulsion Transfers


The second half of our first project is to do an Emulsion Transfer. I took a normally exposed and developed Polaroid photo, cooked it in simmering hot water until the whole of the emulsion came off the backing. It just peeled right off. You do this under warm water so the emulsion stays flexible. It kinda reminded me of a jelly fish floating around. You then put something else in the water with it to take the place of the backing material. I used watercolor paper, a glass bud vase and a metallic piece of tile left over from when I did the bathroom. The objects are put into the water and the emulsion is just nudged until it floats into the approximate position. You hold two corners down and slowly pull the object out of the water. As the water drains off it pulls the emulsion straight and flat. If it comes out wrinkled you just dunk that section back in and let the water straighten it back out for you. Once it dries it hardens back up and becomes attached permanently.
I think the best one was my bud vase. I picked a landscape image with lots of clear pale sky. It seemed to go really well with the transparent nature of the emulsion.

Thursday, June 15, 2006

Polaroid Image Transfers


The first project for this class is done!
Polaroid Image Transfers. Where the polaroid film is exposed in a miniature enclosed enlarger that you can use in the day lab. The negatives I used were slides that I took with a manual camera. After the polaroid is exposed it is peeled apart before it has a chance to develop. And the negative side (the one with all the dyes still on it) is placed onto a piece of watercolor paper. If the paper is wet beforehand the dyes run together a bit and it sort of looks like a watercolor painting.
My sister is a ferrier, so I went to work with her one day at a barn that was close to home. I took lots a pictures of her working, and the horses. The barn lent itself to very atmospheric photos. I enjoyed watching my sister work. The weather was pleasant. And the horse owners were very friendly. Their daughter hovered around my sister, I think she wants to be a ferrier too. It was a nice day all around.

Thursday, May 25, 2006

Welcome!!

Hello Everybody!
This is a journal documenting projects completed for a summer class.
Alternative Photographic Processes
at The Visual Arts Center of Tidewater Community College
located in downtown Portsmouth, Virginia.
Soon we'll be doing Polaroid transfers, cyanotypes and pinhole photos.
Check back for new images.
Wish me luck!